RISC-V is an open instruction set architecture — no licenses, no gatekeeping. You can literally build your own CPU, and I did.
Why did I work on this? Actually, this project was first built by me as part of an initiative taken by SRA-VJTI, a student-run organization at VJTI Mumbai. I built a simple RISC-V CPU, with no verification or pipelining, just to understand how a CPU works. Since then, it's always been at the back of my mind that the CPU I implemented was not very efficient, and I wanted to build a better one.
However, my main reason for building a RISC-V CPU was to learn about the architecture, how verification works, and how to implement pipelining in a CPU.
In this post, I'll be sharing my experience of building a RISC-V CPU, pipelining it and writing testbenches for it using cocotb, which is a popular Python-based
verification framework for digital designs.
CPU Design
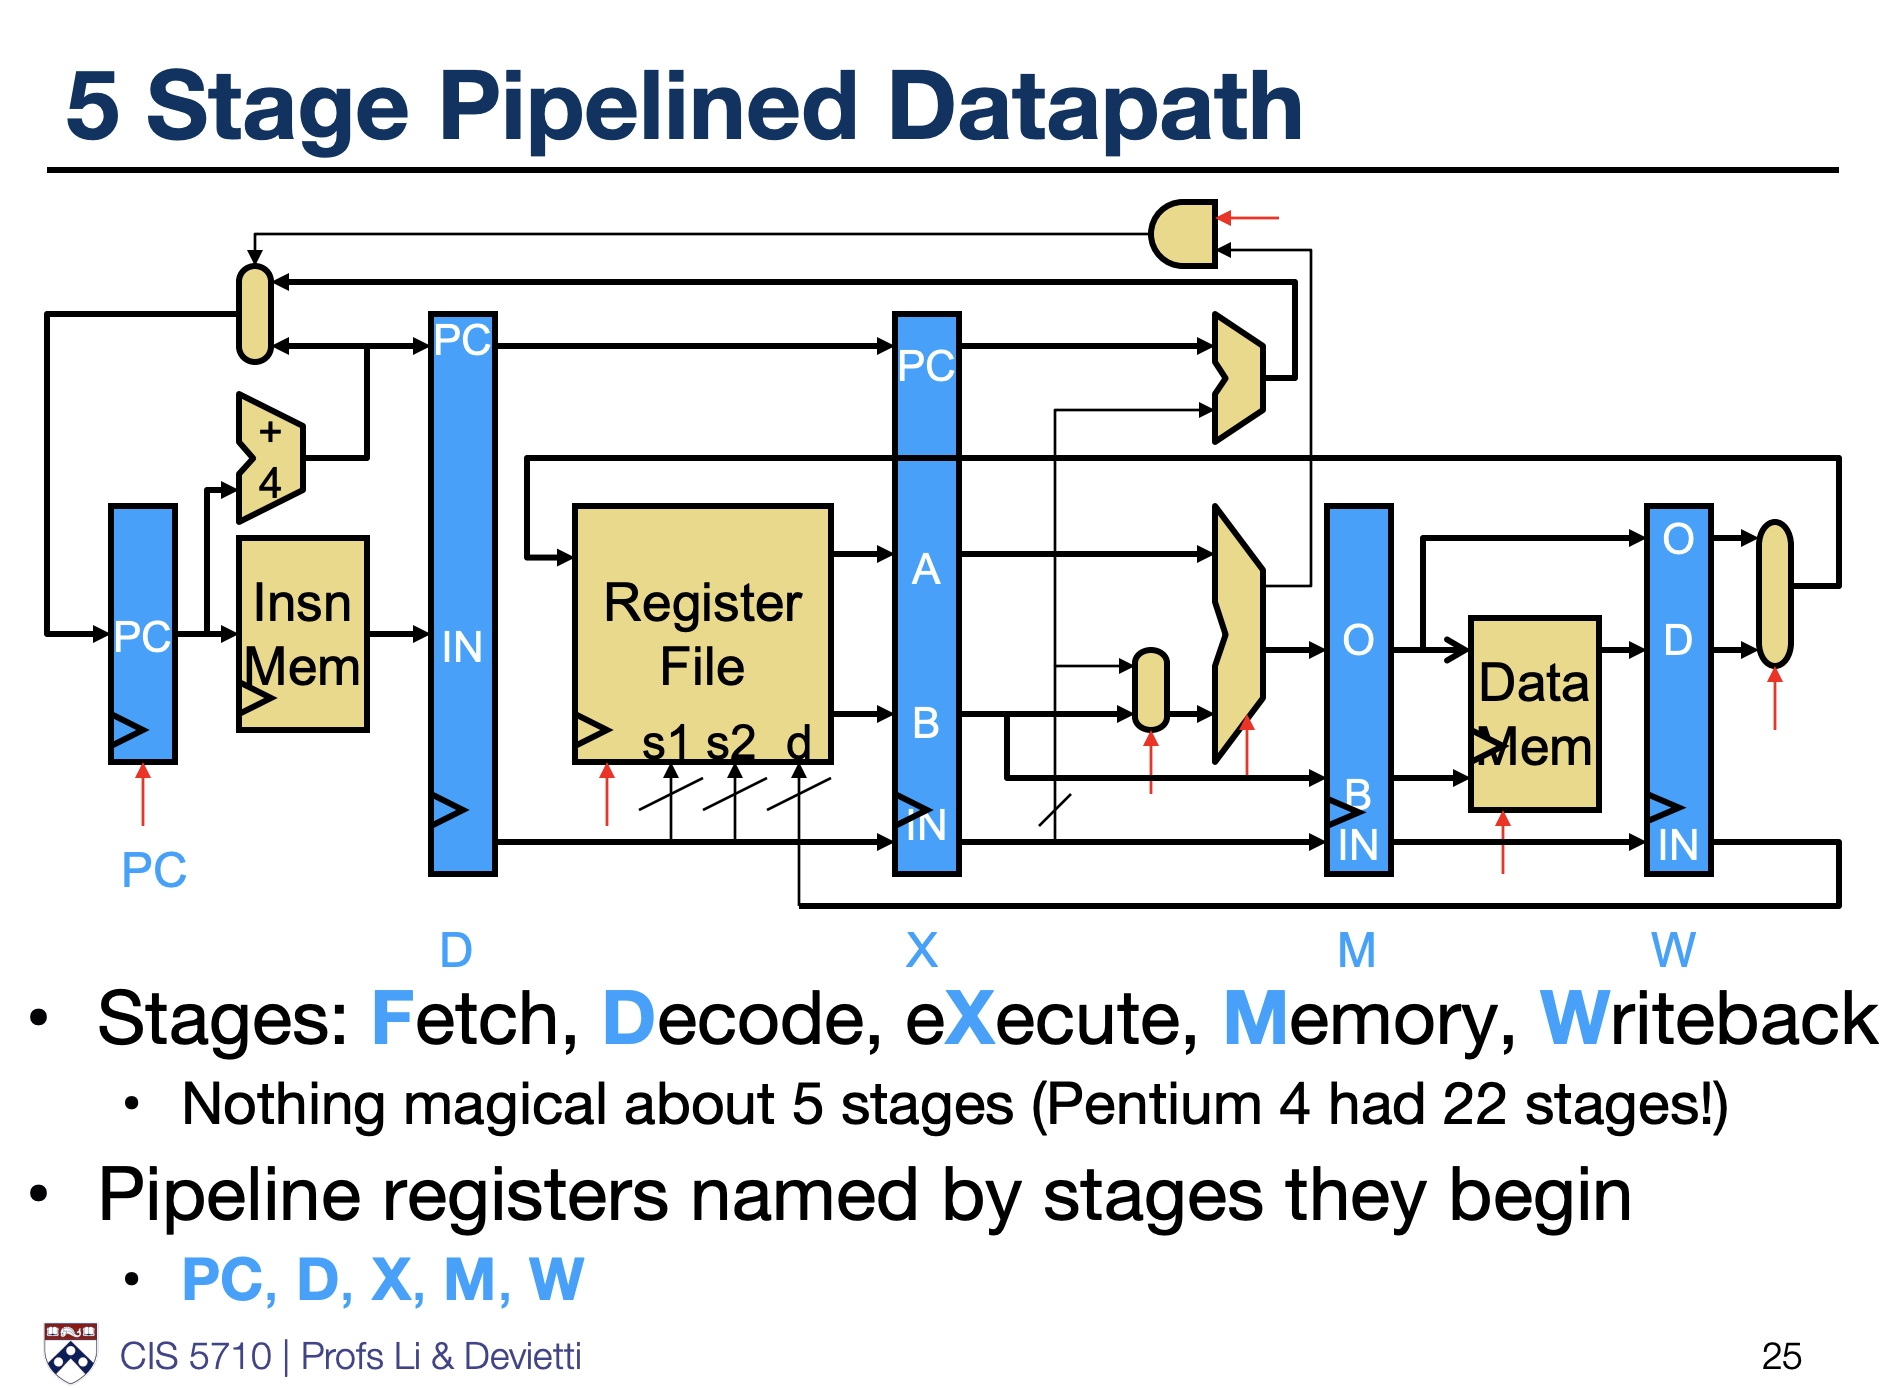
The CPU I built is a simple RISC-V CPU, with a 5-stage pipeline. The stages are:
- Fetch (IF): This stage fetches the instruction from memory.
- Decode (ID): This stage decodes the instruction and reads the operands from the register file.
- Execute (EX): This stage executes the instruction, performing arithmetic or logical operations.
- Memory (MEM): This stage accesses memory for load/store instructions.
- Writeback (WB): This stage writes the result back to the register file.
This type of design is quite common in RISC-V CPUs, and some courses like CS61C at UC Berkeley or CIS 4710/5710
at UPenn use a similar design for their RISC-V CPU. If you wanna learn to design such a CPU, I highly recommend taking that course. It's a great introduction to computer architecture and RISC-V.
Pipeline Hazards
Pipelining introduces some challenges, especially when it comes to hazards. The main types I focused on were read-after-write (RAW) hazards for register and memory dependencies, and control hazards for branch instructions.
To minimize the performance penalty from these, I implemented forwarding logic. This involves detecting when a subsequent instruction needs a result that hasn’t reached
the writeback stage yet, and forwarding it directly from later pipeline stages like EX or MEM. By doing this, the CPU can use results earlier without waiting for them to
be fully written back. It’s a pretty neat trick that makes the pipeline flow smoother without stalling every few cycles.
Testing with Cocotb
This was by far the most fun part of the project, since watching your written HDL orchestrate the CPU is quite satisfying. Cocotb is a very powerful framework for writing testbenches in Python. It allows you to instantiate testbenches in a high level language, and supports many simulators like icarus verilog and verilator.
Cocotb requires a lot of makefile magic, and there's a community maintained package called cocotb-test that simplifies the process of writing testbenches. Instead of writing a makefile, you can write a simple Python script which sets up the simulator.
def runCocotbTests():
    """Run all tests"""
    # Define the test directory and files
    root_dir = os.getcwd()
    while not os.path.exists(os.path.join(root_dir, "rtl")):
        if os.path.dirname(root_dir) == root_dir:
            raise FileNotFoundError("rtl directory not found in the current or parent directories.")
        root_dir = os.path.dirname(root_dir)
    print(f"Using RTL directory: {root_dir}/rtl")
    rtl_dir = os.path.join(root_dir, "rtl")
    verilog_file = os.path.join(rtl_dir, "core_modules", "alu.v")

    run(
        verilog_sources=[verilog_file],
        toplevel="alu",
        module="test_alu",
        simulator="verilator",
        includes=[rtl_dir],
    )
As simple as that! The run function takes care of compiling the Verilog files and running the testbench.
Testing Strategy
Firstly, I decided to isolate the core components of the CPU and write testbenches for them. I'll write exhaustive and random tests for these components, and then integrate them into the CPU. The main ones I focused on were the execution unit (with the ALU) and the decoder.
With python, it was quite easy to write tests with random inputs. I was able to write separate testbenches for each behavior of the module, and then run them with cocotb. For example, here is a simple test for validating the SUB operation of the ALU:
@cocotb.test()
async def test_sub(dut):
    """Test SUB operation (rs1 - rs2)"""
    # Normal cases
    await verify_alu_operation(dut, 30, 20, 0, 0x2, 0, 10, "SUB")
    await verify_alu_operation(dut, 0, 1, 0, 0x2, 0, 0xFFFFFFFF, "SUB underflow")

    # Corner cases
    await verify_alu_operation(dut, 0x80000000, 1, 0, 0x2, 0, 0x7FFFFFFF, "SUB int_min-1")
    await verify_alu_operation(dut, 0, 0, 0, 0x2, 0, 0, "SUB zero-zero")
    await verify_alu_operation(dut, 5, 5, 0, 0x2, 0, 0, "SUB same values")
I wrote many helper functions like verify_alu_operation to simplify the process of writing tests. These functions would take care of setting the inputs, waiting for the output, and checking the output against the expected value.
Fibonacci Example
To make sure everything works as expected, I wrote a simple Fibonacci program in C that I compiled to RISC-V assembly using the gcc toolchain. I wrote my own linker script and startup assembly code to set up the stack, and then passed the entire thing to the toolchain to generate the binary.
The stack setup was a gotcha for me, as I initially forgot to set the stack pointer to the top of the memory. This caused the CPU to access negative addresses, which lead to a lot of red signals in the simulation.
.section .nop_section, "ax"
.global _start
.type _start, @function

    nop # To get the pipeline started
    nop
    nop

_start:
    la sp, _stack_top  # Load the stack pointer to the top of the stack
    call main
    j .
I hope this comes in handy when I want to extend my CPU to support more complex programs, and later ZephyrRTOS. I used cocotb to monitor the memory and registers during the execution of the program, and finally validated the entire state of the CPU after the program finished executing. This was a great way to ensure that the CPU was working as expected, and it was quite satisfying to see the Fibonacci sequence being generated correctly.
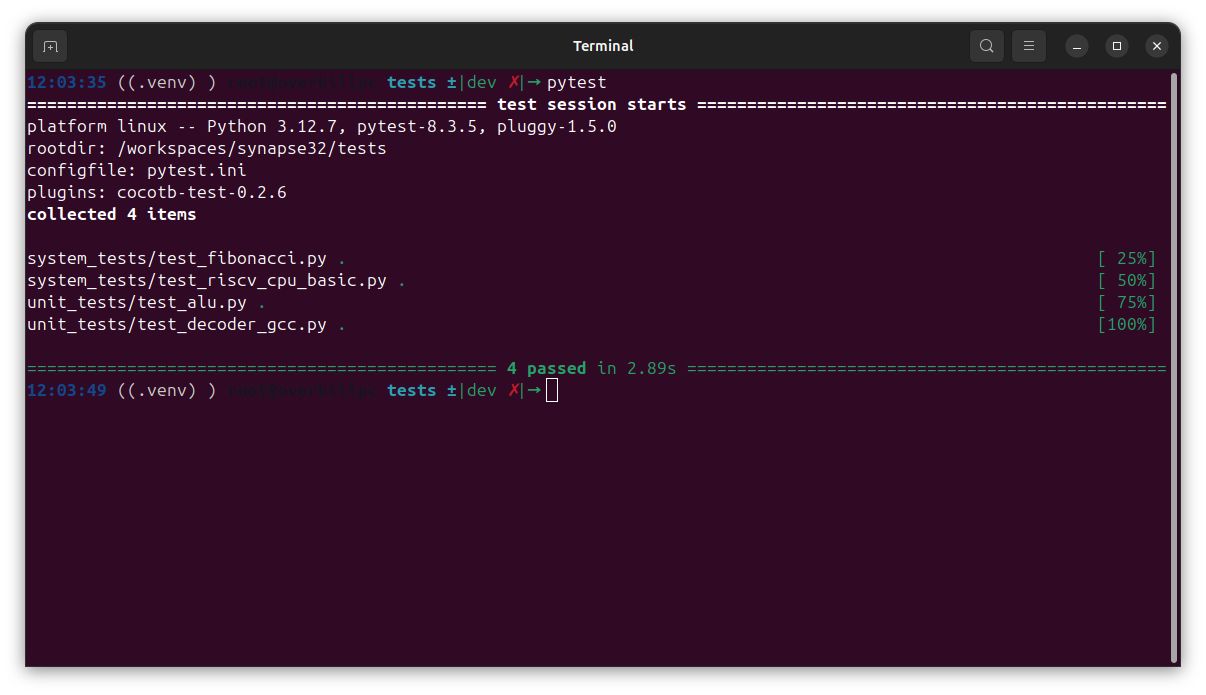
Pytest Integration
Finally, to tie up the entire thing with pytest, which allowed me to run tests with one command, I wrote a simple configuration file for it:
[pytest]
# This is a string prefix that pytest uses to match function names of tests
# during automatic test discovery.
#
# We ensure that pytest only finds one test: the cocotb test runner
# function. The test cases for our hardware are cocotb tests, and need to remain
# invisible to pytest. If pytest tries to run them it will complain about
# `fixture "dut" not found`, as it tries to determine how to pass in the `dut`
# argument to the cocotb test.
python_functions = runCocotbTests
This allowed me to run all the tests with a single command, and it was quite satisfying to see all the tests pass. Later, I aim to integrate this with a
CI/CD pipeline, so that the tests run automatically whenever I push changes to the repository.
What's Next?
Getting something like ZephyrRTOS to run on this CPU.
That means adding interrupt handling, exception logic, maybe even virtual memory. It’s ambitious, but that’s the point. I want to build something that actually proves that RISC-V enables someone to build their own CPU with modern RTOS support.
Hopefully, I can share more about that journey in the future.
Until then, the code’s up on GitHub. Dive in, mess around, contribute if you’re into it.